
I have used paper stencils in a screen printing workshop with Prints Charming (here’s my Charming Frolic) and I have made my own freezer paper stencils when I made A Feeling for Snow for the Twelve by Twelve BlueWhiteBlack Colourplay challenge but I have NEVER used plastic stencils. So when Terri invited me to be part of her stencil blog hop, I jumped at the opportunity. Boing,boing!
Your Chance to Win Two Stencils
Terri sent me the Curvy Fronds and Signposts stencils that echo some of my favourite motifs:
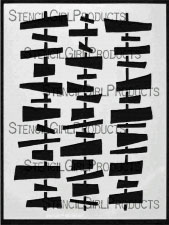

The stencils are produced and sold by Stencil Girl Products.
Sun Printing
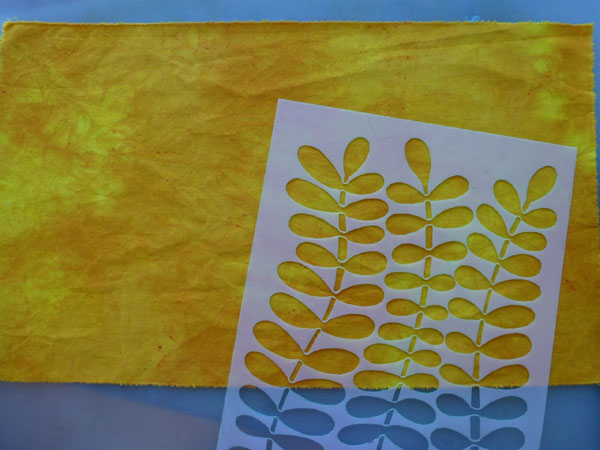
It’s the height of summer here in Australia with perfect conditions for sun printing so that is technique I tried first. I started by ironing my fabrics and taping them taut to some plastic craft trays that I have. Then I lightly spritzed the fabrics with water and applied slightly diluted textile paints with a foam brush
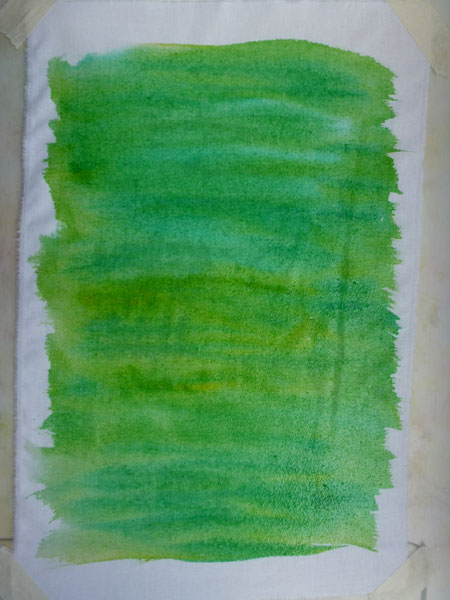


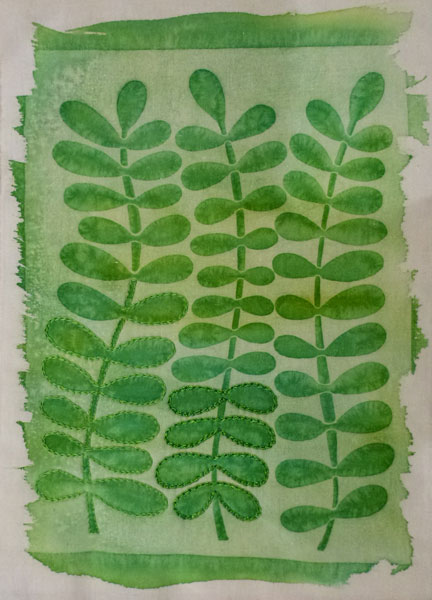
Then it’s simply a matter of laying the stencil over the top of the wet paint and letting the sun do its magic:


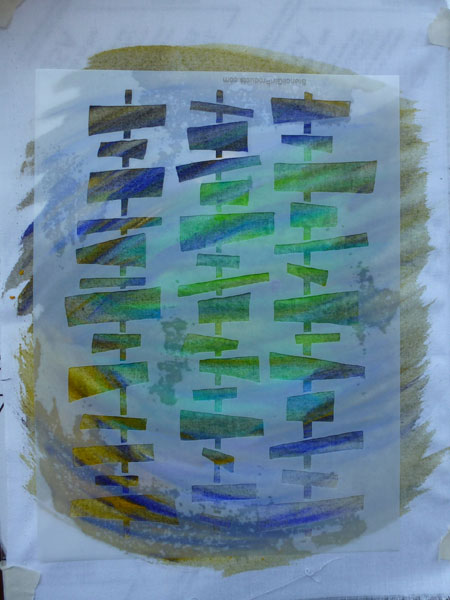

Here are the results. I have started to machine quilt around the sign post shapes and I am adding hand stitched outlines to the light green fronts:


Stencil Brush
Next I tried applying paint with a stencil brush. This brush has short, densely packed bristles that are all the same length. The theory is that you apply the paint with a circular motion and the paint is less likely to get under the edge of the stencil. However, you will see that I diluted the green paint too much and significant bleeding occured.


In this example, I did not dilute the textile paint at all. It’s a little stiff but I would happily machine quilt it:

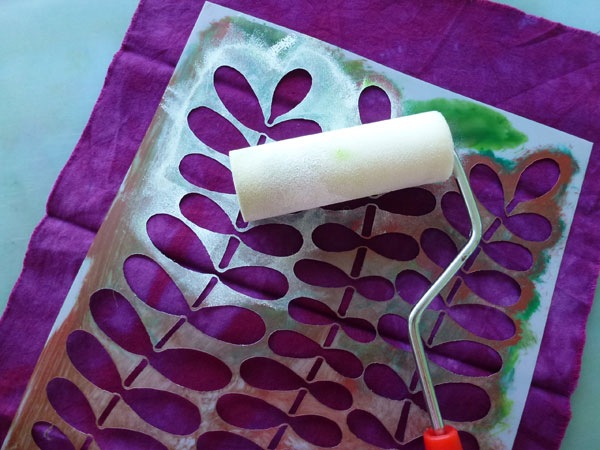
Foam Roller
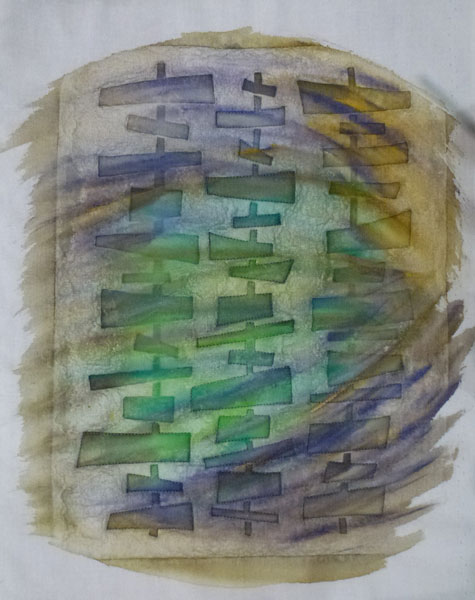
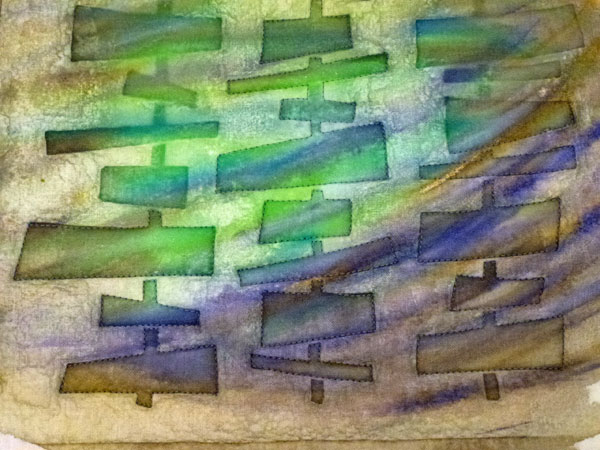
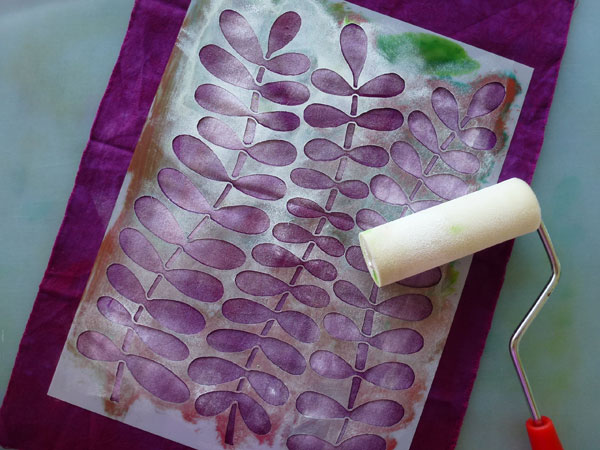
Finally, I experimented with a foam roller and undiluted textile paints using partial stencils and layering:
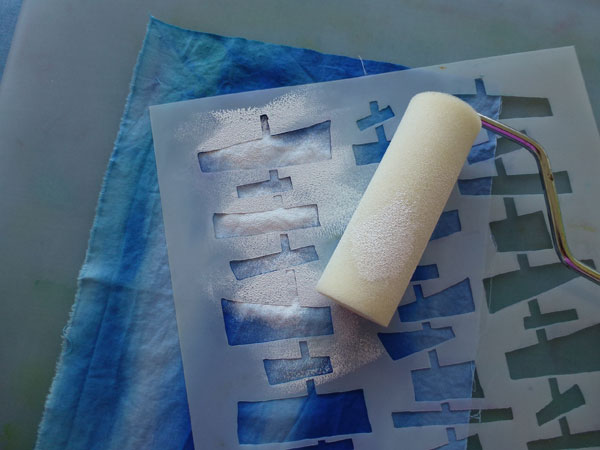

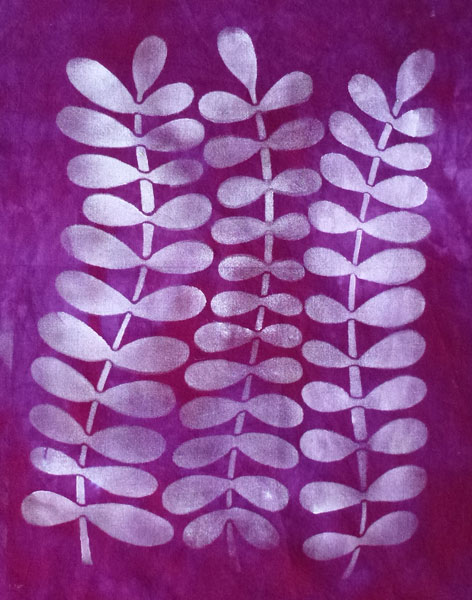
The foam roller gives a lovely, soft transparent effect and I love how this piece turned out:
In fact, I liked the foam roller so much, I pulled out the yellow piece from my stencil brush experiments and applied some more layers. Redemption! – it is much more interesting and nuanced now:

Thanks for joining me on the Stencil Blog Hop. I’ve had such fun playing around with Terri’s stencils but I’ve barely touched the surface of their potential! Several artists are sharing many creative techniques with Terri Stegmiller’s new line of stencils, produced by Stencil Girl Products. Each day of the hop you will see two new stencils (14 in all) being used by an inspiring artist. Be sure to visit all the other artists participating in the Stencil Blog Hop. You can enter for more chances to win some of Terri’s great stencils.
Blog Hop Schedule 20 -27 January 2013 (US dates):
Sunday, 20 January (Kickoff) – Terri Stegmiller
Monday, 21 January – Leslie McNeil
Tuesday, 22 January – Deborah Boschert
Wednesday, 23 January – Margaret Applin
Thursday, 24 January – Brenda Gael Smith – that’s me!
Friday, 25 January – Vicki Welsh
Saturday, 26 January – LuAnn Kessi
Sunday, 27 January – Sue Bleiweiss

Kim / SeeingStars says
I’ve not seen the sun painting technique before. It’s very pretty. The idea of FMQ around the edges of the design looks terrific too. 🙂 Thanks for sharing your ideas about Terri’s stencils.
LynneP says
Really appreciated how you showed your process…I liked each of them because they gave a different look. Thanks for the chance to win the stencils.
Pam S says
You work is gorgeous! I love the layers of color. Thanks for the opportunity to win stencils!
Linda Germain says
Thanks for showing the 3 paint application options. I would love to win those stencils
Leslie says
WOW! Nicely done. Thank you for going step by step too, that’s a great help.
So nice to have a chance to win the stencils too.
Kelly Hutchens says
I LOVE EVERY one of these stencils!!! and REALLY LOVE how you used them Brenda!! Thanks for sharing! Have truly enjoyed your Twelve projects also!! Thrilled to see them in person in Cincinnati last spring.
Kathryn says
I love what you are doing with Terri’s stencils.
Having a chance to win them makes the dreaming even better!
elle says
What lovely effects you have achieved with these stencils. The creative ideas for this hop are wonderfully enlightening. Thanks.
Tammy Bowser says
I love the sun painting pieces, but then the one you finished with, rolling over the running piece was perfect! These stencils have all been great so far!
Deborah Levy says
Sunprinting with stencils…brilliant! I use stencils for all kinds of techniques, but never thought of that one, thanks Brenda!
Kathleen Wilson says
I have never tried sun printing but I will now and I must get a foam roller. Loved your work. Thank you for sharing.
Linda Strowbridge says
Your comparison of techniques is really helpful. And I had never thought about sunprinting with stencils, but it looks great.
patty says
Thanks for showing your experiments! Now I will have to try the sun printing! How long do you have to leave the fabric in the sun? Does it need to be hot outside or could the winter sun work? Right now it is 14 degrees F in Ohio, but the sun is peeking in and out thru the clouds.
Gay says
Thanks for sharing your ideas! I never thought of using a roller.
Love the stencils.
Christina Fairley Erickson says
Wonderful tutorial on different ways to use stencils. For those of us in a cooler, cloudy climate, I thin that the sun printing method will work with just leaving the stencil on top in a warm room and letting it dry… worth playing with. I’m done patterning with cut pieces of lightweight plastic that way.
Connie says
What beautiful work and thanks for sharing all the different techniques! The sun printing is so neat, I want to try that!
Doreen says
I loved the sunprinting and the roller effect. I have never used stencils that way before. They were beautiful. Thanks for showing your methods.
Daryl says
I love all your ideas how to use stencils. I’ve done some of them before, but now I want to play with the other ideas too. Thanks for sharing this.
Donna Keller says
Both of these stencils are very cool but the Sign Posts is my favorite! I could have a lot of fun with these stencils. The layers on the yellow piece look fantastic, and I love your awesome sun printing technique. I need to give it a whirl sometime!
Have a fabulous day.
D~~~~
P.S. Thank you for letting us see you jump by adding “Boing, boing!” to the end of that sentence. I love it!
Del says
This online project is going to create a lot of stencil addicts. I agree with everyone, the sun printing is inspired.
Gill says
What fun!
I think these two are my favourites so far!
Tesuque says
I like the way you “rescued” the brushed piece on which the paint seeped under the stencil.
Rhoda Forbes says
Absolutely love what you have done with these two wonderful stencils. I love to sunprint and your results are fabulous. Thanks for being a part of this blog hop and giveaway I am so enjoying all the different art work with the stencils.
Angela says
Love these stencils! Love your ideas!
Gunilla Börjesson says
I love what you made with the stencils! Should love to win!
laceflower says
Everyday I’m inspired by how each artist uses the stencils. I particularly like the sign post stencil. Lucky you to have the sun! Well…. we all have the sun, just that you can see it!
sheila says
I think these stencils are my favorite so far , beautiful work! I have never tried sun dying but it is on my list of to do’s . Thanks for the inspiration . Greetings from cold Nova Scotia!
Erica says
Love the last piece Brenda. Beautiful layers!
Jennifer Scantlebury Vienneau says
First, I am extremely jealous of your sun and heat! It is currently -42 C here and that time of year when you really have to keep reminding yourself why you love the country you live in. lol And I love, love, love what you have done with these stencils! Especially enjoy how you rectified the yellow piece and shared it all with the blog world.
candy says
I couldn’t wait so bought a few and they arrived today so guess what I am headed off to do? They are very cool. Thanks
Jeannie says
I am really enjoying this blog hop because I am learning so many new techniques! I have sun printed a lot with leaves and such, but never did the thought cross my mind to use a stencil! Inspired!!! Now, if it would get warm and sunny so I could try it out. 🙂 I love Terri’s stencils. Each blog post show me a new “favorite”. I love the curvy fronds, but head over heels in lust with the sign posts. Your fabric turned out wonderful! Thanks for the inspiration.
Helen says
Great to see the images of the different methods you used with the stencils Brenda…they look like fun and am thinking I will have to research them further. Yes, it is so hot here in Oz that sun printing is just so easy to do right now…Love, love the fronds and the result you obtained with the foam roller…so pretty and delicate…thanks so much for sharing this with us… would be so joyous to win one too…
Joy V says
Love doing sun printing – never thought to use stencils. Must check out the other blogs. Thanks for the chance of winning some.
Munaiba says
I’ve never used stencils before but it looks like fun and the designs on these are lovely.
Kate Sykes says
Loved the look of the stencils, and thank you for showing how to use them.
Amalia Parra Morusiewicz says
fun! never thought of using a stencil with a sunprint, love that you get the color in the shape you want, as opposed to the sunprint of an object where the color lands in negative space Thanks!
Sue Dennis says
I recently tried the sun printing with a stencil- such interesting effects! Thanks for sharing Brenda.
Sophie says
Everyone in the group has really found a way to use the stencils in a way that make the project identifiably theirs. I love the sun-print idea. Thank you for sharing.
Leanne says
You posted some great ideas of how to use stencils, some of which I had not seen or used before. Thanks for the tips!
Michele lasker says
Brenda, I love what you did with the stencils. I was particularly intrigued by the sun printing. I appreciate your use of the word “nuance” as you worked to improve the yellow piece. I think I need to “nuance” some of my work that just isn’t quite finished! Thanks for your wonderful suggestions on using these stencils.
Patrise says
I have to try sun printing with stencils now. I like these stencils. The designs are simple but have a rhythm about them. Can’t wait to see the others.
MaureenC says
I recently tried sun printing with (plastic) stencils and was less than impressed with the results.
Howeverthe way you blogged your steps encourages me to try again: both new pieces and “nuancing” the first attempts.
I love the idea of Terri’s signposts……ideas for postcards are already whirling around in my head.
Saucy Chick Sherry says
Your work is inspiring with all the different techniques you did with Terri’s wonderful stencils. The many layers you have applied result in a depth of beauty. The ghostly layer of white with the foam roller is refreshing. Thank you for participating in this very fun blog hop. Creative Hearts are Happy Hearts…
Jane Prater says
The sign posts stencil really intrigues me. I love your color choices.
Diana says
Love the stencils and what you have done with them….love to win them.
Michelle says
Thanks for the stencil inspiration!
Sandra Chavez says
I liked the idea of using pinpointing techniques with the stencils. Beautiful work, looking forward to seeing more of your work in the future.
Sandra Chavez says
make that”pinpointing” …..
Sandra Chavez says
Doggone spellchecker! I meant Sunprinting …
Renee says
Love your creativity with the stencils and your bright colours!
Lin says
Looks like you had a lovely time playing with these great stencils. Where are they available from?
Carol says
Wow! Thanks for sharing your tips/tricks! I would have never thought to use the stencils for sun printing. As soon as the cold New England winter eases up I’m going for it!
Thanks so much and please consider me for Terri’s cool stencils!
carolreaton@comcast.net
Marsha says
Wow- I love sunprinting too. The long fern/leave stencil is perfect for it. Would love to win these.
Sandra Ellison says
I love those stencils and would be very happy to win them! Thanks for the opportunity.
Terri says
Wow…you really provided a wealth of information regarding the stencils but also paint and painting techniques. Thank you. I really like Terri’s stencils – she’s done a great job of creating some interesting designs.
Vickie says
Lovely! I, too, like the roller results. I’ll have to give it a go!
Kathi says
Wow what a great idea, using the stencil for sun printing. I have used stencil and I have sun printed but never the two together. I will be trying this as soon as our Sun comes back and the rains move away :). Loved the roller brushed stencil also.
anna says
The pieces of work you have done are beatuiful I would llove to win the stencils and have a go too
Frances M. Arnold says
Fun stencils and great ideas for using them!!
Mary says
I have only just discovered Blog hopping but have come out of the dark ages to the beautiful rainbow of colour you have created with these great stencils. Your creations have sparked many ideas on how I could colour my world not only on fabric but also on paper and upcycled fuirniture. Thank you for the introduction. The pleasure was all mine!
Annette says
Thanks for the inspiration. Thank goodness for clever people constantly creating more ‘toys’ to spark creativity!
Imzadi says
Thanks for showing all the different ways of applying paints to stencils and the different effects. People usually demo one way. It’s nice to compare the effects with the same stencil and get to choose which effect one wants for a specific project.
Susan says
Great ideas for using the stencils. I especially like the effects with the brayer (roller) – very nice!
Thearica Burroughs says
Great tutorial so we can get an idea of different ways to apply the paint with the stencils! I would love to practice stenciling fabrics! It is on my to-do list. Thanks for the chance to win!
El Wilson says
Loved the tutorial with some great ideas. If I was lucky enough to be selected I’d use them with my Gelli plate too. Thanks for a chance to win.
Patchacha says
Love what you’ve done !
Rasa Mauragis says
Love the layering effect and a reminder how something that started as not being something you were happy with was incorporated into such a successful piece. Love the tutorial. What an inspiration to do something.
Sheral Brewer says
Wow awesome how beautiful. Would love the stencils really nice work.
susanbh1 says
You really make this look so easy, with such beautiful stencils. Thanks for sharing the knowledge!
Dotti Cullen says
I just love what all of you are doing with Terri’s new stencils…especially the sun printing technique that you did!
Grace says
I have never tried sunprinting, it looks easy and the results fantastic. Thanks for sharing!
Debbie M says
I’d love to try out these stencils! Thanks, Brenda and Terri!
Janny says
Those stencils are wonderful and I love the way you used them. Thanks for the chance to win.
Kristin L says
Such a clever lady to sun print with your stencils! I need to remember that. My favorite one is all the layered colored leaves though.
LynneP says
Thanks for the chance to win the stencils. Loved seeing the techniques you have used.
Annette S says
Great layering with the fronds stencil. Could see using the signposts horizontally for fencing. Thanks for a chance to win.
Crickett says
Love the fronds! Please enter me too.
Gari says
I love your roller pieces, especially the purple on which looks like powdered sugar had been sprinkled on the fabric. I am seeing such creativity as I run through all of the blogs on this blog hop. Thanks.
Renate says
It looks like you had a whole lot of fun playing with those stencils. Oh I would love to be able to play too!!
Linda stokes says
You’ve obviously had fun playing with these stencils with great results!
Carol Claytor says
Everyone has such a different way of using these stencils. I’m thoroughly enjoying this blog hop. Thanks.
Deb says
WOW – sun printing with textile paints! I will definitely be giving that a try this week with our beautiful Florida sunshine we are having.
Manuela says
Realy great work – I will recive those georgous stencils…
June Y. says
I just found your blog via the stencil blog hop. It is amazing to see all of the creative ways you all are using these stencils. I am very interested in trying some of the techniques that you showed, especially the sun printing. I have been wanting to do this for some time and I will bookmark your post so that I have it when I am ready to try it out (hopefully with Teri’s stencils!).
Vivien Zepf says
Ooo la la — I really love the final yellow piece with all the versions of painting through the fronds stencil. And the sun printing idea — I’ll have to remember that when the sun come out again! 🙂
Ruth says
Thanks for the tutorial – it’s always interesting to see how people use things. I must get around to trying the sun printing technique.
Gini Cooper says
This post is awesome – I’ve never heard of sun prints done like this. It’s raining cats and dogs but if the sun ever comes out, I’m trying this. I love the ghosty image with the roller, will try that too. Thanks for chance to win some stencils!
Kim says
Thanks for sharing the tutorial. I always like to see how others approach various media. Love the sun stenciling results!
Noeleen Smith says
I am just starting out in the world of dyeing myself, despite having quilted and other craft for many years. I am loving what the stencils are doing in your blog. Your blogs have been really helpful
Kathy nesi says
Love your techniques, can’t wait to tey the sun printing! Thanks for the inspiration!
Trexxann says
Your work here is beautiful – thankyou for sharing your techniques – I love the foam roller look!
Sandy says
Absolutely inspiring! Living in Arizona, sunprinting is a natural. I agree with your delight with the foam roller results.
carolegoldquilts says
Thanks for sharing some of your ideas.
Lorraine aka grannypoppy says
Stencils have been a favourite of mine for a long time so it’s really awesome that they have become popular and are so much more readily available .. in such great patterns, too! Love your colour scheme in your first example! Thanks for a chance to win 🙂